
This project was months in the making and while it required substantial time to execute, the time to percolate ideas was even greater. I think about rich people (‘rich’ by my standards at least) and how they probably never do anything satisfying in their life. Not saying that all rich people don’t work hard, but to undertake a personal project when you have unlimited money, or at least resources, would leave you with a great finished product and no road to get there. How could you ever admire such a thing? Well, I don’t have that problem!
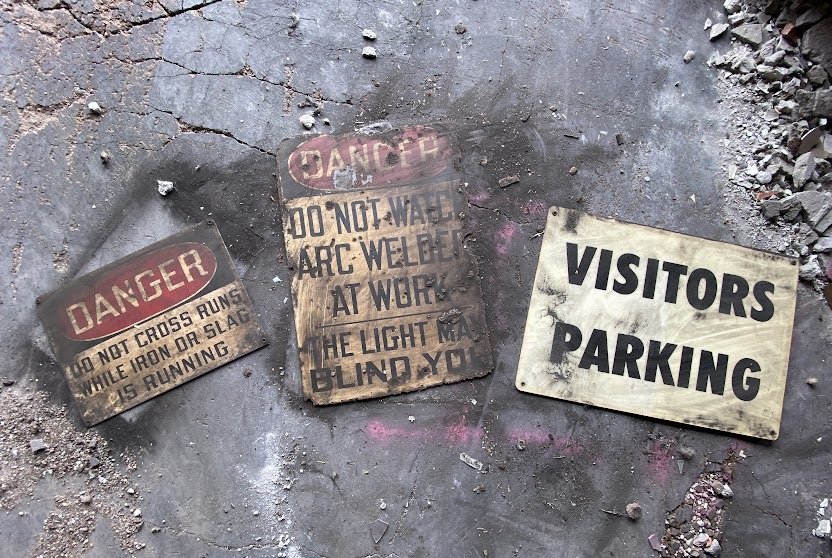
On 4/29/22, I found three amazing signs in the gate house. But the situation in which I located them is what makes it very interesting. The northern most ‘room’ in the building (it is midway between the 1st and 2nd floors, from the stairwell) I believe was once a room, but was paneled over at some point when it was determined that it was no longer needed.
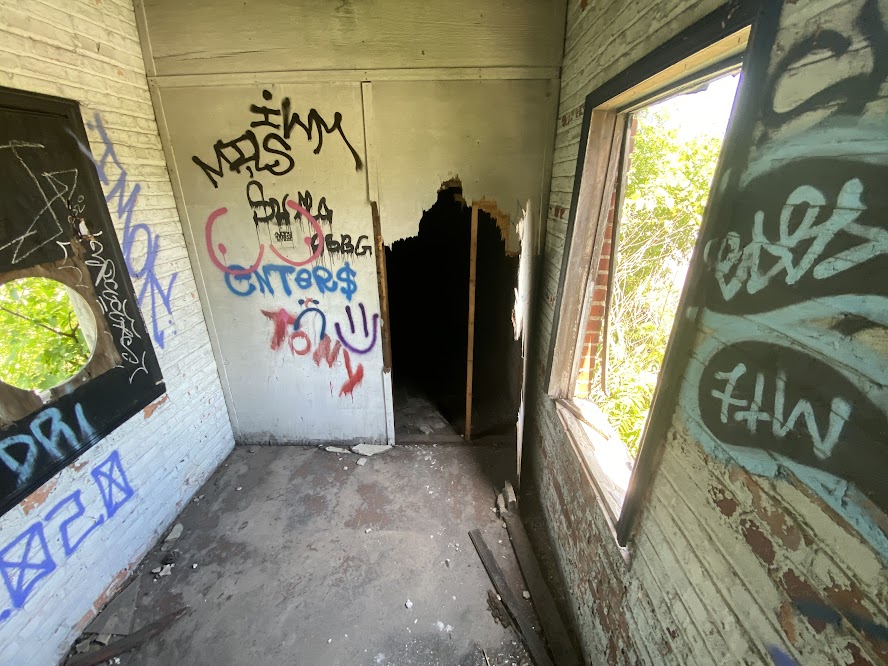
When I first visited the plant back in 2020 (and for substantial time after) I did not know this area existed. It must have been about a year ago that someone smashed through the paneling. Certainly, looking at the building from the outside would tell you that there was a ‘dead zone’ there, and someone was curious enough to see what was inside. Alas, they would have found nothing. I did stick my head in there when I first saw the roughly torn opening in the wall and found only darkness and dust.
But that day in late April, I stuck my head in there once again as I headed upstairs and in the very dim light I saw something, or at least I thought I did. I am so conditioned from 40 visits to the plant and years or urban exploration elsewhere, that even when I am walking down the street if I see a piece of paper I will often pick it up to see what it is. I am especially predisposed to anything flat and rectangular for it may be the biggest score of all – a sign! Can’t imagine how many pieces of plywood, plain plastic, cardboard and other materials I have overturned in my hunts at the coke plant and around the country.
My point in bringing up the fact that someone smashed a hole in this wall is that I do not believe these signs were boarded up into this area years ago. I think someone stashed them there – but that means they had to have done the stashing in the past year or so. But where did they get them? The ‘do not cross runs’ sign is 100% from the furnace plant which was razed 20 years ago. I’m not sure how great of a window there was between the plant closure and it’s destruction but it couldn’t have been long (less than a year?) and it was decades ago. If they were hunting at both locations, why didn’t they just take that one home? It isn’t very large.
But I did indeed thieve away their booty. I took the ‘cross runs’ sign home immediately. I wasn’t sure if I wanted the sign outlined in this post – so I stashed it. I even offered it to a friend once I went home that day. He was interested, so I made a note to return to get it for him.
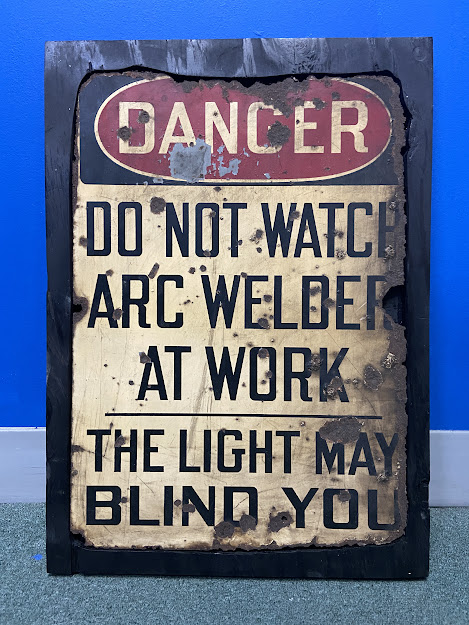
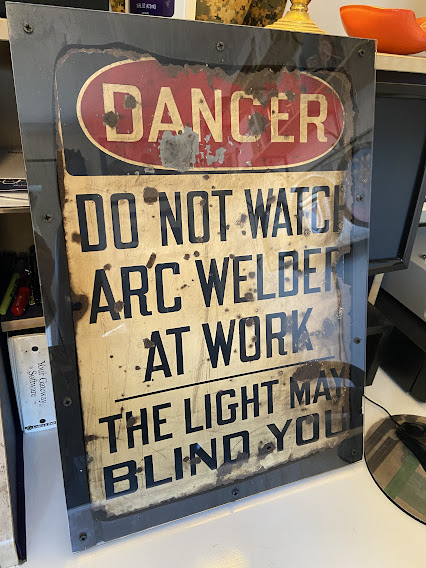
It is in bad shape, to be certain. Almost the entire perimeter has been eaten away by corrosion and it is covered with real welding slag. None of that can be restored. It it were not for the amazing content (message) of the sign, it would likely not be worth salvaging at all. Just as the arc of the welder is destructive to the eye – the nature of the same work appears to have been destructive as well to the sign itself. And that is what allured me – for I did not take the sign for my friend, I took it for myself. The weekend before I undertook a one month trip out of state (5/22), I was down in Hegewisch hanging out. When I got ready to go home, I decided to take the sign. I parked across the street on Torrence (something I have never done), and ran inside to get it. I was probably back in my truck in about 90 seconds. I took it home and gave it a good cleaning and then the gears began to turn on what the hell to do with this thing. It deserved a handsome and functional mount but there were a few limitations in place.
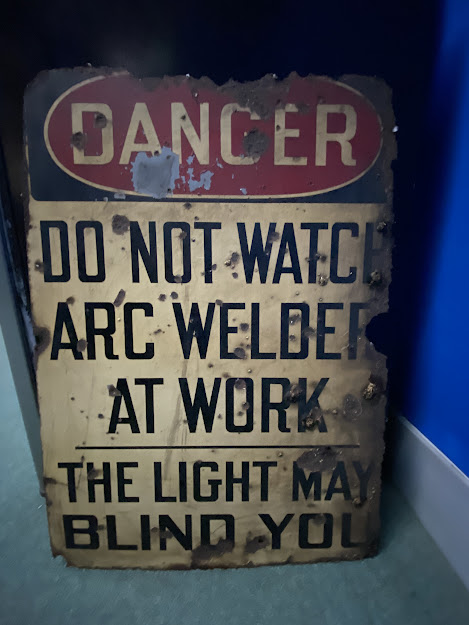
First of all, there are no mounting holes. It appears there may have been but those areas are rusted away. There is no way I’d drill a hole (even though one would certainly be sufficient to support it’s weight). I needed to find another way to retain it in a frame. So for the 4 weeks I spent working on a construction site in South Dakota, periodically I would consider ideas. Of course, I started out by only coming up with a vastly over engineered plan. I could make a frame from mitered 1×2, then carve a rabbet with a router into the bottom to accommodate the sign and a piece of acrylic. The rabbet could not only support the sign, but it would also retain it in the frame. This was directly inspired by the TQI frames I have. But this is problematic as I’d need to purchase lumber (I’d prefer to salvage) and I’d need obscure dimensions. Also while I do have a couple routers, I’d have to build some kind of jig to get it accurate enough to do the job. So I kept on thinking.
When I got home in mid-June I kept thinking and then an idea struck me. I didn’t need the rabbet – I could just support the sign with the frame itself. Of course now it could simply fall out, but the acrylic would hold it in place. But this too would be difficult, because to call the outline of the sign a compound curve is an understatement. But I knew if I could pull it off, not only would this be functional but it would be something to admire in it’s complexity.
So I started with a (very old and salvaged, but high quality) piece of 3/4″ plywood. I traced the outline of the sign, with all it’s dips and dives, onto the plywood. I drilled 1/2″ holes in the corners with a forstner bit and then cut out the shape with a jigsaw. Of course I could not cut it perfectly so this is when the real fun began. Using a couple files and rasps, a belt sander (80 grit) and an orbital sander (120 grit) I removed additional material in the problematic areas and test fit the sign many, many times. When I finally got it, I glued this frame to a piece of really cheap 3/8″ CDX. I applied my clamps and left it overnight.
The next day, I flush cut the edges of my laminated work piece with a circular saw. Now more engineering needed to be done. The 3/4″ depth was far too much for my thin sign, I didn’t want it to sit so far back inside. I could have used the 3/8″ but it is low quality and I was worried it might crack while working it into shape with such small margins. So I experimented with a number of materials to ‘lift’ the sign closer to flush. In the end, ironically I used more 3/8″ CDX which brought it to just shy of flush. I did have some interesting black foam which looked like it would compress enough if I wanted to use the acrylic for that task but I decided against it. This would require heavier (and more expensive) acrylic and even then it might bow from the force. Also, I thought that having it just shy of flush might add just enough depth to make it visually interesting. So I used two big pieces of scrap CDX which filled the void about 90% and screwed those into place, then cut the tips of the screws off the back with an angle grinder.
At this point I decided I still wasn’t quite happy with the test fit. I was ready to paint, but I didn’t want to sand off paint if I found the fit wasn’t perfect. So I went back to work with 60 grit by hand until I was satisfied. Then I rattle can’d it black with a couple coats. Once that was dry, I was ready to button it up with my acrylic but I had a problem. It was now Sunday night about 6pm. My main source for acrylic is a hardware store that will cut them to size for me. This saves me the trouble (I won’t do a very good job anyway as I have to use a Dremel, jig saw, coping saw and/or crappy $5 acrylic knife) and also makes me not responsible for the drop from the cut. But they are closed all day on Sunday. I can buy sheets from Menard’s and cut myself and they are open until 10pm even on Sunday. But I did have some used sheets I could salvage.
So I rough cut my size with a jigsaw, then had to spend probably 40 min fine cutting the edges with a coping saw and getting rid of the melted flash with files and the orbital sander. But this is where I was going to get creative. This sheet was used – it was scratched up pretty good. But I had seen watch makers restore watch crystals (also acrylic) with sanding sticks followed up a polish. I didn’t have any polish but I did have 180/240/320 grits for my orbital. So I went at it with those and it did indeed remove all the scratches as expected. It also turned the sheet very cloudy (also as expected). I know watch makers use something called Polywatch which clearly I do not have. A bit of research showed an alternative called Autosol which is actually a metal polish (but apparently not so abrasive that it will damage plastic). I couldn’t get that either. But Autozone had other metal polishes, so I went over and spent $7 on a 5oz jar of Mothers Mag polish for aluminum wheels.
The bad news is this did not work sufficiently. I think it would work, but not when applying manually. I’d need a flap wheel to apply with a straight or angle grinder and the cost of that would far exceed the cost of waiting until Monday to buy the cut sheet from the hardware store. But Monday is a long way away when you are deep in a project. So I loaded everything up to headed to Menards to buy a sheet and cut it with my knife (which actually worked fairly well the previous time I used it).
Alas, Menard’s was closed as they observed Juneteenth on Sunday. So alas the project would go unfinished. But Monday morning the hardware store was open so I headed over and paid $11 for my perfectly cut sheet. I elected to use dry wall screws as they are black and blend into the black frame. I drilled holes large enough to accommodate the entire screw diameter in the acrylic and much smaller pilot holes in the frame itself. I countersunk the acrylic as best I could – I couldn’t truly do so as the sheet was a bit too thin for that and I didn’t want the holes to get brittle at the bottom. I put in 10 screws and at last – this is done and I could not be happier!
I found a very similar sign for sales on an artifact website, they claim it is circa 1930 and made by a company in Denver. Signs with identical wordage are still manufactured today so I do not know for sure that this is the same origin as my sign but it is possible.