I have found three large tools at the plant in the past month or so. I took them home to clean them up and give them a new life. There is something magical about giving these abandoned tools a new, safe home where they can live out their days. When I hold them in my hands, I have a small portal to the past and I imagine how they were used.
Tool #1: Open ended wrench
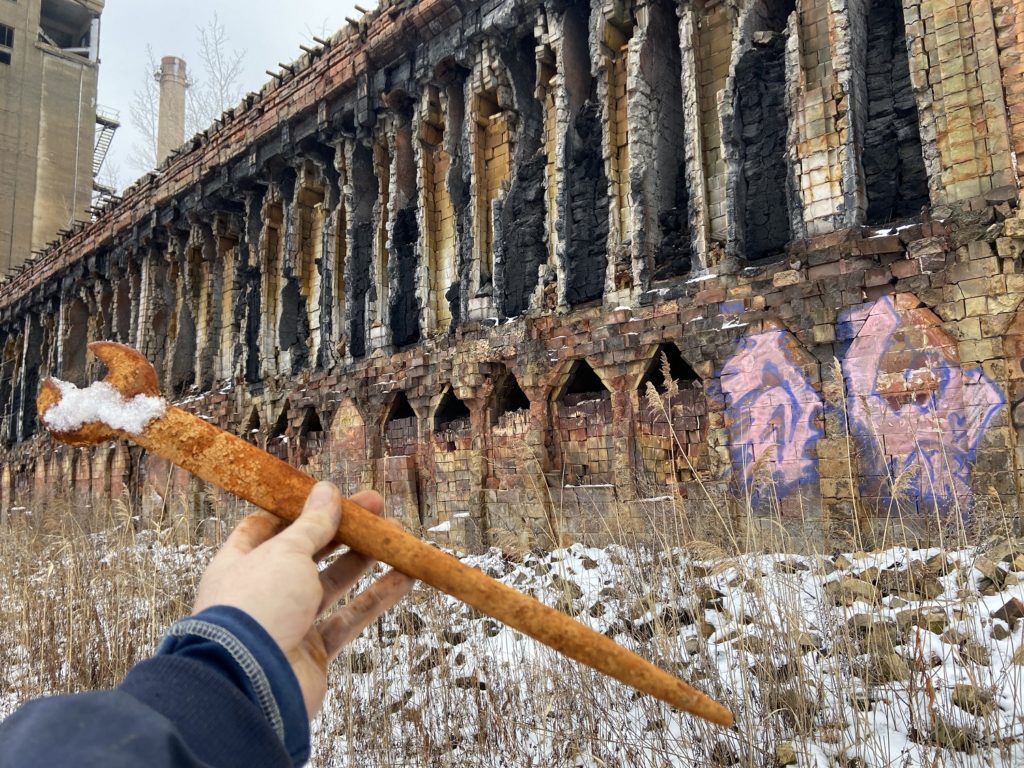
Location found: Battery #1 basement
Date found: 1/3/21
Description: 1 1/4″ open ended wrench with custom welded ‘spike’ end.
This wrench had laid in oily, wet sand for nearly 20 years when I found it by kicking it in the dark. There are loads of valves and pipe work and I know that when the battery was functional there was far more, so I imagine a wrench like this was used often. It stained my gloves and clothes immediately and even left rust stains all over my bike. The rust was like a thick scale and did not come away easily. I started out with a belt sander and 50 grit sandpaper. I did some file work on troublesome areas and then did some sanding by hand with the same 50 grit. Eventually I moved onto an orbital sander with three grits (240, 360 and 400). I used a wire brush on a straight grinder to get into the many cavities all over the body of the wrench. Last I used a bench grinder with a cloth/canvas buffing wheel and plenty of buffing compound.

The finish on the wrench is now wonderfully smooth. Nothing can be done about the many pock marks all over it. Some are likely from where rust ate away some of the material but I think most are from use of the wrench. I’m sure it was swung like a hammer to bash things many times in the course of a work day. Once I got it shined up, it was interesting to notice the different finishes on the top and bottom. I was sure from the beginning this was a custom welded tool. The weld is all but hidden, someone did a very nice job.. However clearly they come from different grades of steel as the shine on the spike end is much shinier. I’m sure that end was used as a pry bar, or to align holes so a bolt could attach two pieces of stock together. However, it might be something much more interesting. I found this recently in the lidman’s training guide. It may have been in the basement instead of on the roof, but at least it was in the right department. I’ll hold out hope that one day I can get a confirmation.

[Edit: Just got this note from Doug “Yes its a reamer! but used for lining up holes too! We used them on top for steam jets as you surmised but also in the basement .”]
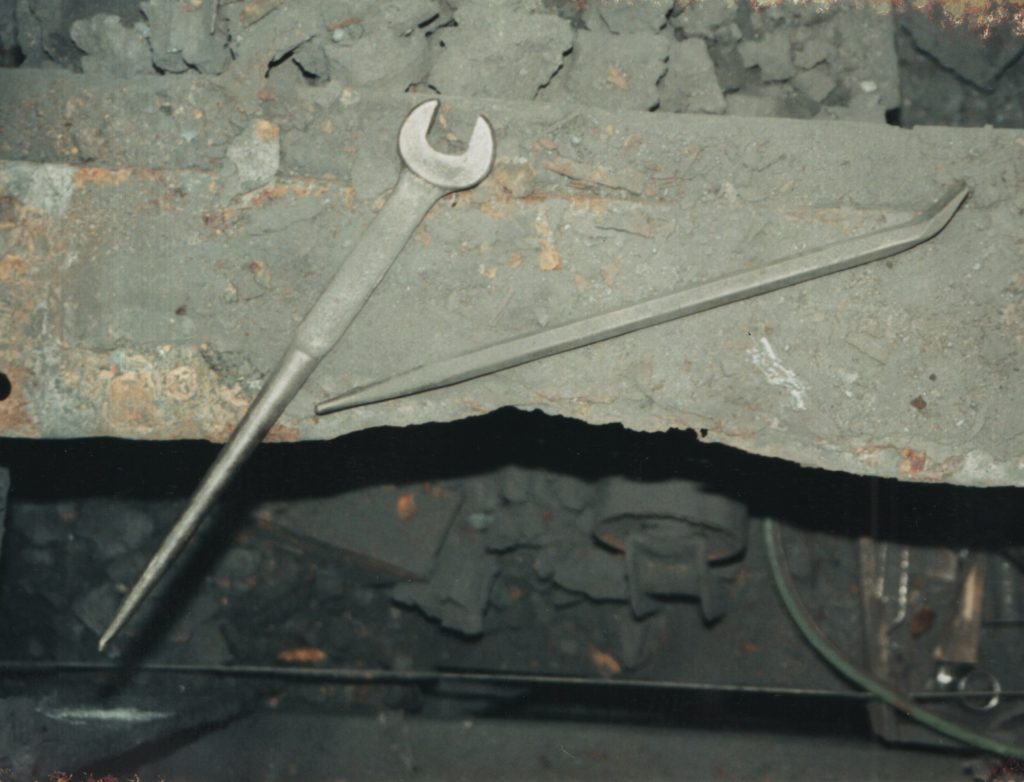
[Edit: I later found the below photo in March 2001. That’s my wrench! (probably one of many)]
Tool #2: Pipe Wrench
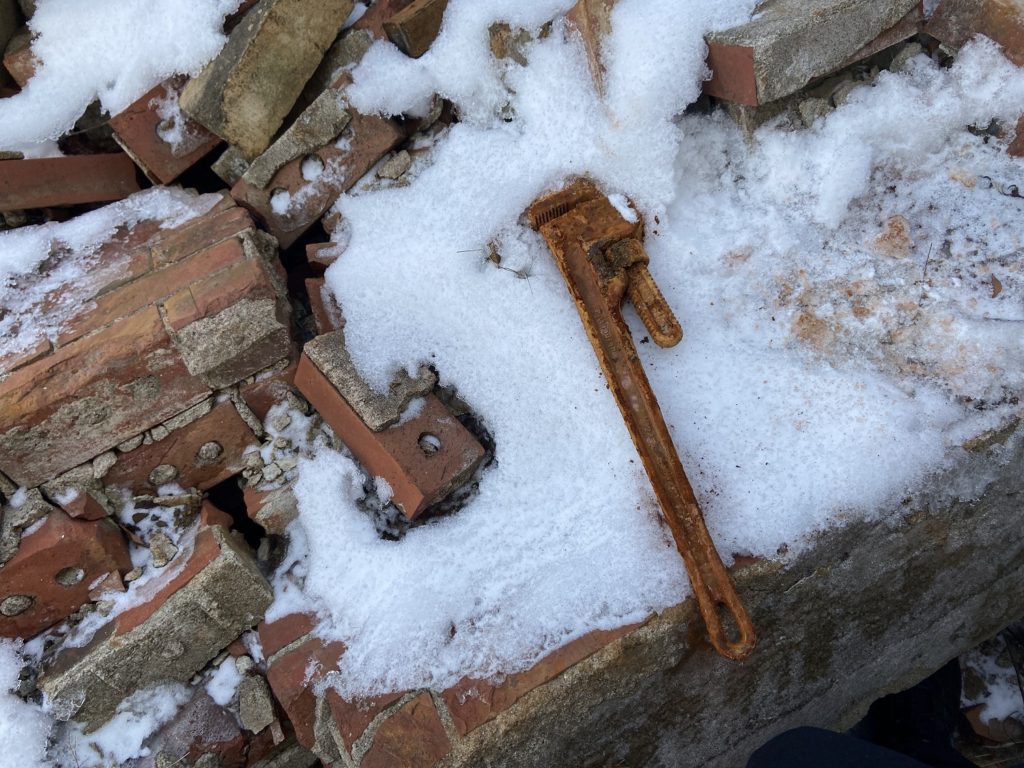
Location found: Battery #1 basement
Date Found: 1/10/21 (located the week before)
Description: 24″ pipe wrench
Note: I returned this wrench to it’s rightful owner on 4/24/22.
I actually found this pipe wrench the same day I found the 1 1/4″ described above. I decided to leave this behind as it was much heavier and less interesting but of course I could not resist returning to get it a week later.
As it is a number of parts, disassembly was important but very difficult. The nut that manipulates the hook end of the wrench was of course jammed. Notice in the photo above (taken just outside the door to the basement) a darker, black corrosion in that area. At that point means to get it apart are brute force. I tapped it with a hammer many times and tried again and again to get it loose. Eventually I got it to turn about 25% of a rotation but no more. Then I put it in a vice and got it free with – you guessed it – another pipe wrench. The threads of the nut cut through whatever rusty muck was in there and I then had the three pieces separated. The heel jaw (as seen above) is mysteriously missing, as was the roll pin that secured it.
After that I soaked all three pieces in a basin of rust remover. I used soaked paper towels wrapped around each piece to help the exposure. After about 36 hours of this I scrubbed and scraped mechanically. As the tool is not a smooth, continuous piece like the open ended wrench I had worked on last, things would not be a simple as using a belt sander. I did try anyways, the best I could on whatever flat areas existed, mostly on the handle. The handle was of course pained red, as pipe wrenches of any brand often are. I believe the hook jaw was painted black but it was hard to tell as most was gone. I ran through my normal assistants such as the orbital sander, sandpaper, files, wire brush and eventually my bench grinder. I did get a second wheel for the bench grinder, this one made from sisal (rope).
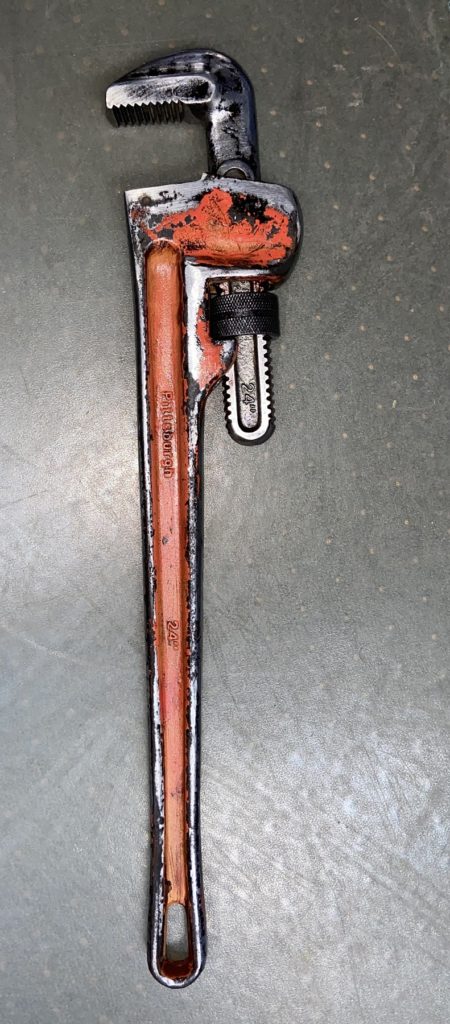
I originally planned to repaint it but decided that would be pretty fake. This wrench will likely never twist another pipe so I oiled it up to keep new rust away and hung it along side the 1 1/4″ in my office. But not before I ordered a new heel jaw for $5 on eBay. It didn’t drop in but it was close. I took some modification with an angle grinder to get them together. It did come with a roll pin but it was a bit large for the hole in the wrench. I tried anyway and it distorted quickly then broke. Luckily I was able to drive the remains out with a drift punch. Then I saw I did have some socket cap screws and lock nuts that were magically the exact length and diameter. I feel a bit guilty for this shortcut but I’m going to go with it anyway. I am convinced that even if I did use the wrench, and on a regular basis, this fix would still be very effective and secure. I did use a countersink bit to make the hole on the wrench conical and the screw now fits perfectly flush. Very satisfying.

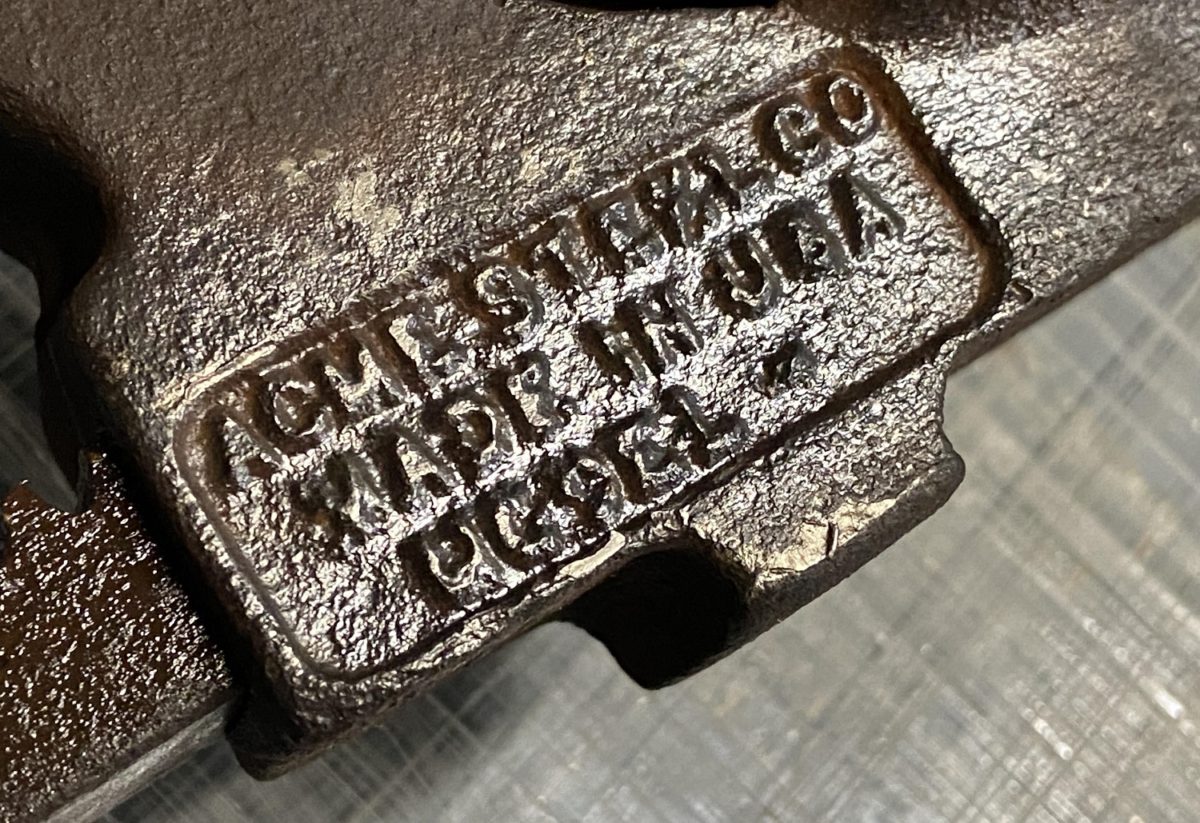
Tool #3: Steel Band Tensioner
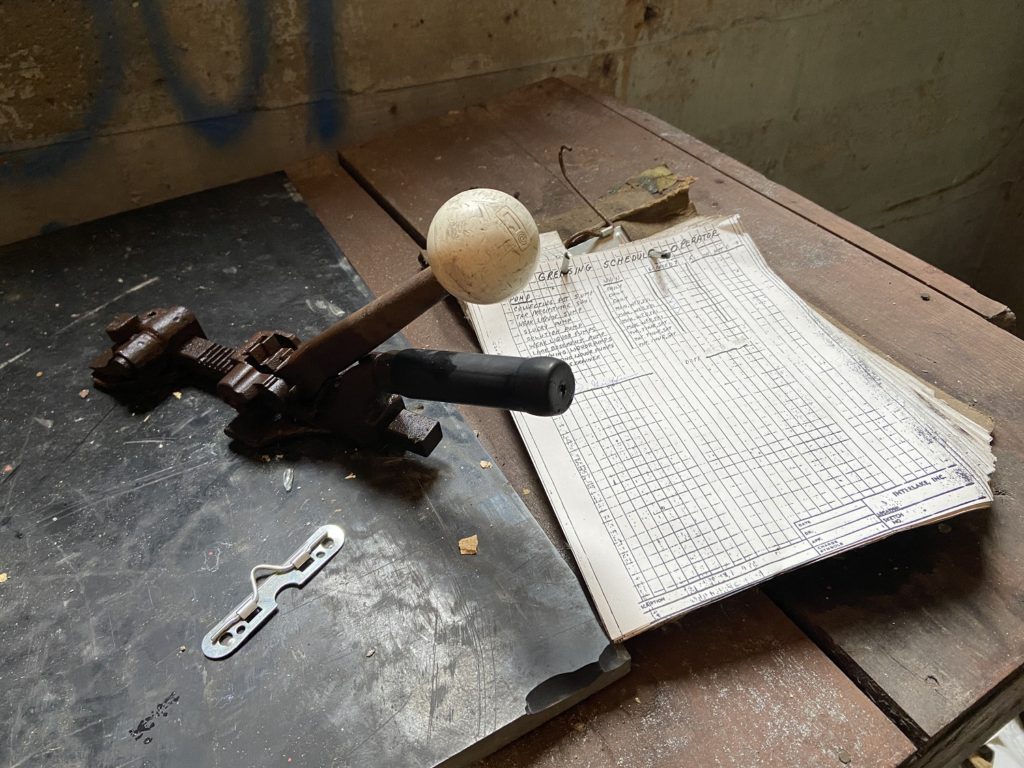
Location found: outside coal handling office
Date found: 1/16/21
Description: Acme brand ratcheting strap tensioner
This was located for me by my man FALS. He was only curious about it’s use or history which I was glad to share, and even more glad to take home and work on.
My first thought was just to get the stuck mechanism free. Then, perhaps I could disassemble it for proper rust removal. Unlike the two wrenches above which were encased in a heavy scale, this has more of a patina so I may not pursue total removal. But I did try initially by soaking it in vinegar for about an hour. Then I used plenty of WD-40 to the axle. A small gear rotated on the axle, which indexes on the straight toothed bar in the base. The lever manipulated the gear but nothing would move. With the help of a hammer I did eventually get it free. Plenty of vinegar and flushing with water, the aforementioned solvent and a hell of a fight from me got it progressively looser. I did have to remove two small springs as they prevented further disassembly and had lost their tension. A third spring was already gone. I still cannot figure if this bolt which acts as an axle is retained with an unseen clip or other mechanical means because no amount of force will budge it. The head is slotted and even using a screwdriver with a vice grip on the handle it will not turn free. So I only used a wire brush on the small exposed area of the gear, then flushed it again and again with water and finally used compressed air to remove the detritus.
Now, 24 hours later, my hands are still stained with the filth I pulled out of there but after a nice application of thick red grease the gear spins very freely and indexes very well. Without the one of the small springs I was forced to sacrifice, the handle no longer turns the gear but it can be manipulated by hand with even the slightest force. In lieu of a video, the two photos below are intended to demonstrate the full travel of the handle and toothed bar.
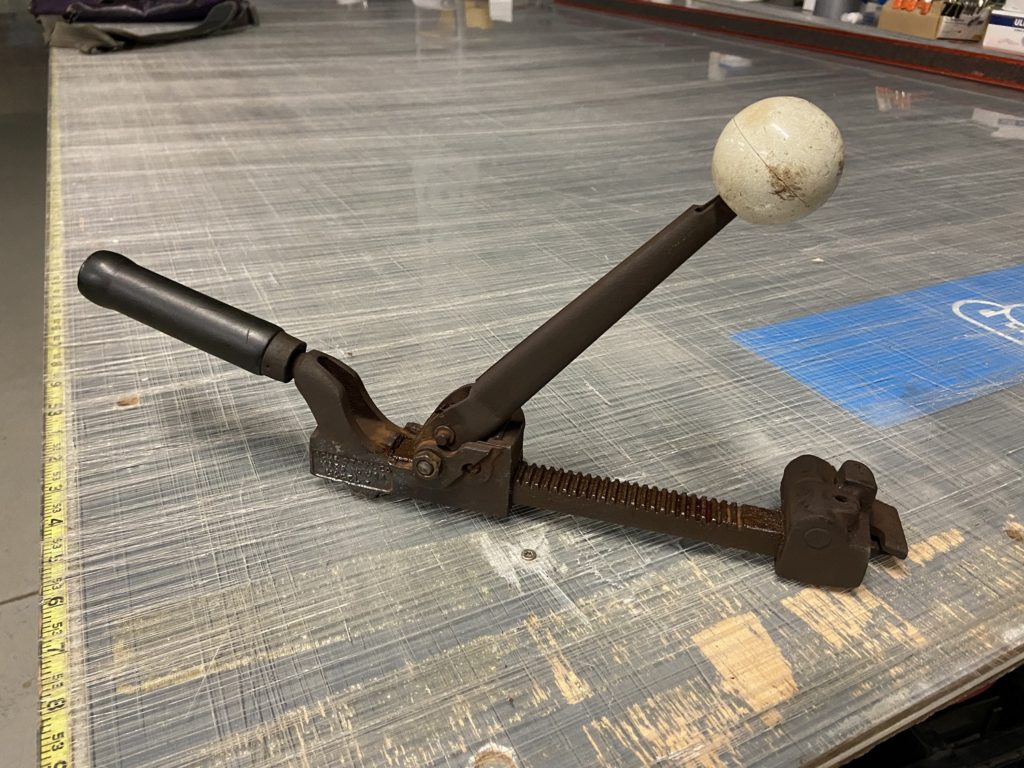

I was very torn on how to proceed with this tool. Unable to extract that bolt, I am very limited on rust removal since I cannot disassemble. I got fed up and just sat down with a sheet of 80 grit and just sanded by hand for about 30 minutes, doing the best I could. Made quite a mess!

After that, I went at it with a grinder with a wire brush. Then the bench grinder with sisal and canvas wheels. At least now I can see casting marks, so I know I am getting close to bare metal. Two part numbers have been revealed: “NH4” and “C2317F”. This is as far as this one will go unless I get access to a drill press to destroy that bolt. I think it looks pretty good.


3 replies on “Tool Restorations”
Some real history there, nice restoration.
The coloring of the faded paint, and natural patina on that pipe wrench is beautiful. I’m glad Bob got to bring that baby home, it is a beautiful tool. Nice restoration.
the polish i got on the upper jaw was really awesome, it felt like glass. it always did bother me that i didnt go get a proper roll pin for it, it was crazy how well that nut and bolt fit. i considered painting the body red again, it was hard not to. getting all that rust off, i ended up taking some paint with it unfortunately. it wasnt a specialized tool so i wasnt that attached to it and often wondered if maybe it was left behind by the guys that stripped the plant in 2006. i was glad to hear it was a legit coke plant tool. and yes giving it to bob was a thrill of a lifetime i never thought id get to achieve. the still of him examining it just after i handed it to him is such a great photo, im really happy it got to go home.